Friday, February 26, 2010

Open Visio 2007 and Excel 2007 documents in separate program windows


Open Visio documents in separate windows:
-------------------------------------------------

1. Open Microsoft Visio
2. Go to Tools -> Options -> Advanced
3. Check the Put all settings in Windows Registry option
4. Close Visio
5. Run Registry Editor (regedit)
6. Navigate to the following registry key:

HKEY_CURRENT_USER\Software\Microsoft\Office\12.0\Visio\Application\

7. In the right pane, right click on SingleInstanceFileOpen, and then select Modify.
   Update the value of SingleInstanceFileOpen from 1 to 0.

(Create it if it doesn't exist. Use String type and make sure Visio is not running)


Open Excel documents in separate windows:
--------------------------------------------------

1. Open My Computer
2. Click on Tools, then Folder Options
3. Select the File Types tab
4. Scroll down to the XLS extension
5. Select Advanced
6. Select Open
7. Select Edit…
8. in the line that says "Application used to perform action:",
   go to the end of the line and add "%1" (that would be %1 WITH double quotes)
   so for example it may read something like
  
   "C:\Program Files\Microsoft Office\Office12\EXCEL.EXE" /e "%1"

9. uncheck Use DDE
10. Do not make any other changes
11. Click OK and click OK again
    (note: if you go back into advanced and back into the open action, you will notice DDE is checked again, however the DDE message is blank; this is fine.)

12. Now scroll down to XLSX
13. repeat steps 5 through 11 above
14. Click on Close
15. Now, when you click on Microsoft Excel 2007 spreadsheets, they will open separate windows for each Microsoft Excel 2007 spreadsheet that is launched.

Note: Microsoft Excel 2007 spreadsheet windows will open on top of eachother, so you will have to drag the windows in order to see them.

Auto-number rows in Excel

Unlike other Microsoft Office programs such as Microsoft Word, Microsoft Excel does not provide a button to automatically number data. However, you can easily add sequential numbers to rows of data by filling a column with a series of numbers or by using the ROW function.

Note   These numbers are not automatically updated when you add, move, or remove rows. You can manually update the sequential numbering by selecting two numbers that are in the right sequence, and then dragging the fill handle to the end of the numbered range.

  1. Select the first cell in the range that you want to fill.
  2. Type the starting value for the series.
  3. Type a value in the next cell to establish a pattern.


    For example, if you want the series 1, 2, 3, 4, 5..., type 1 and 2 in the first two cells. If you want the series 2, 4, 6, 8..., type 2 and 4.

  4. Select the cells that contain the starting values.
  5. Drag the fill handle Selected cell with fill handle across the range that you want to fill. To fill in increasing order, drag down or to the right. To fill in decreasing order, drag up or to the left.

Surround 5.1 in Winamp

VL Sound for Vista/7
v1.0.0.15

This is an output plugin to play music using a wide range of speaker configurations under Vista/7


Get it here <--

JAVA - ActionListener for MenuBar

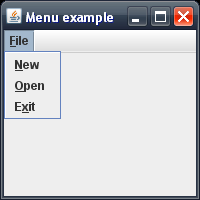
This example shows how to construct menus in Java.
The main Menu "File" contains three subitems. Each item can be accessed by a mouse click or by its keyboard mnemonic. Once a subitem is clicked a message is displayed explaining wich subitem was clicked.


import javax.swing.*;
import java.awt.event.*;
public class Menu extends JFrame
{
    public Menu()
    {
        super("Menu example");

        JMenu file = new JMenu("File");
        file.setMnemonic('F');
        JMenuItem newItem = new JMenuItem("New");
        newItem.setMnemonic('N');
        file.add(newItem);
        JMenuItem openItem = new JMenuItem("Open");
        openItem.setMnemonic('O');
        file.add(openItem);
        JMenuItem exitItem = new JMenuItem("Exit");
        exitItem.setMnemonic('x');
        file.add(exitItem);

        //adding action listener to menu items

        newItem.addActionListener(
            new ActionListener()
            {
                public void actionPerformed(ActionEvent e)
                {
                    System.out.println("New is pressed");
                }
            }
        );

        openItem.addActionListener(
            new ActionListener()
            {
                public void actionPerformed(ActionEvent e)
                {
                    System.out.println("Open is pressed");
                }
            }
        );

        exitItem.addActionListener(
            new ActionListener()
            {
                public void actionPerformed(ActionEvent e)
                {
                    System.out.println("Exit is pressed");
                }
            }
        );

        JMenuBar bar = new JMenuBar();
        setJMenuBar(bar);
        bar.add(file);

        getContentPane();
        setSize(200, 200);
        setVisible(true);
    }

    public static void main(String[] args)
    {
        Menu app = new Menu();
        app.setDefaultCloseOperation(JFrame.EXIT_ON_CLOSE);
    }
}

Unable to move (rearrange) toolbar buttons in Firefox

Solution found by Jeremy

I seem to have found the cause of this issue. I started firefox in safe mode with all plugins and addons disabled and found I could buttons around. I restarted firefox normally, disabled the few plugins I had one by one and found the culprit was the skype plugin that comes with skype. I uninstalled skype (addon) and the issue appears to have been completely resolved.

Solution found here.

.

Remove Photoshop CS4 portable license agreement popup

The license agreement pops up whenever you start Photoshop ?
Everytime ?

Rename adobe_eula.dll to something else.

.

Miranda Icon Blinking settings

SysTray:
Options -> Contact list -> System tray icon area -> Disable icon blinking

General:
Options -> Events -> Ignore -> Suppress online notification (set for all users)

 .

How to reopen a closed tab in Google Chrome

You finally get to the webpage you've been surfing for and now you've accidentally closed the tab. This can be a very frustrating situation. Chrome is quite forgiving and allows you to easily reopen the closed tab, even if you've closed other tabs after it.

Using a Keyboard Shortcut:
By using the keyboard shortcut Ctrl+Shift+T, Chrome will open the last tab that was closed. Use the keyboard shortcut again, and it will open the tab that was closed before that, and so on. You can use this method to restore up to the last 10 tabs that have been closed during your browsing session.

Using the New Tab Page:
Open up a new tab. Go to Recently closed tabs section located in the lower-right of the page. You will find the last 3 tabs that have recently been closed during your browser session.

.