Thursday, November 18, 2010

How to install Flash in Firefox without Administrator permissions

  1. Download the XPI archive of the Flash Player Plugin to your hard disk (right click on the download link then "Save link as.."). XPI archives are only ZIP files containing the files used by the plugins.
  2. So you can safely rename the file you just downloaded, called flashplayer-win.xpi, into flashplayer-win.zip (you are changing its extension from .xpi to .zip)
  3. Extract the files in the archive. You can use any program capable of opening .zip files (WinZip, WinRAR or the free and great 7-zip). There are also websites which can uncompress archives: wobzip.org.
  4. Copy the files flashplayer.xpt and NPSWF32.dll to %APPDATA%\Mozilla\Plugins\
    • %APPDATA% is not a real folder. It's an alias. By inserting it in your windows explorer address bar, you'll be redirected to the real folder which holds your applications profiles and settings. The location of this folder depends on various setting that's why we need the alias and not an absolute path.
    • You can open this folder simply choosing "Start → Run → Type in %APPDATA% → OK".
    • In case you don't have a Plugins folder you can create one and place your files there.
  5. Restart Firefox
Taken from HERE.

.

Firefox - How to get back prompt to "Save and Quit" when closing Firefox

In address bar type:
about:config

Search for and set following string:
browser.warnOnQuit = true
browser.warnOnRestart = true
browser.startup.page = 0

 .

Tuesday, October 19, 2010

Windows XP - Monday first day of the week in systray Calendar (Clock)

Regedit:

1. HKEY_CURRENT_USER\Control Panel\International.

2. Change iFirstDayOfWeek entry in the right pane from 6 (Sunday) to 0 (Monday)


.

Wednesday, October 6, 2010

How to adjust audio/video sync in an AVI file using VirtualDub

How to adjust audio/video sync in an AVI file using VirtualDub

Sometimes Audio/Video sync problems happen due to errors in capturing the video file.
Here is how to fix it.
  1. Open your video file in VirtualDub by dragging and dropping the file on the program.
  2. Click on Audio -> Interleaving or press (Ctrl + I) on your keyboard.
  3. Now in Audio skew correction text box type a value in millisecond (1000 ms = 1 second) following the instructions: Use positive values if audio is playing too early or negative values if the opposite is true

    vdubremovecom03 (42K)

  4. Click Ok and don't forget to Click Video -> Direct stream copy and Audio -> Direct stream copy because we do not want re-encoding here.

  5. Click File -> Save as AVI or press F7 on your keyboard and save the file.

Wednesday, September 8, 2010

Black Theme for Office 2007 including Outlook

Open Microsoft Word and click the Office Button (the button in the upper left-hand corner) and then click the “Word Options” button on the bottom of the Office menu.

The “Popular” option should be selected by default when the menu opens, but if it isn’t click on it from the left side navigation menu.


Click the drop down arrow for the “Color Scheme” option and you will see all three themes. Select the theme of your choice and click the “OK” button.

Wednesday, September 1, 2010

CSS - Stop text wrap around picture that floats left or right

Some of the most frustrating moments I had when I was learning CSS layouts revolved around the "clear" attribute. Clear makes your content stop wrapping around div's or pictures that are floating to the right or to the left.

Just put picture in one div and text in another one and format your text div like this:

[div style="clear: both;"]
YOUR TEXT
[/div]


.

Wednesday, July 7, 2010

Skip Logon screen in Windows XP

Windows security updates are undeniably a good thing, but they can be pesky at times. One of the oddities is that after a couple of the patches your computer will no longer go straight to the desktop at bootup, but will display the Logon screen. This can be especially annoying since most machines have only one user account on them. These are the few steps it takes to have Windows XP skip the logon screen and booting straight to your desktop.

1. Click Start -> Run
2. Type or copy-paste: control userpasswords2
The window shown below should appear.


3. DO NOT UNCHECK ! the box that says "Users must enter a user name and password to use this computer". You have to highlight the default user account first, and then uncheck the box.

Windows will autoboot to whatever account is highlighted when you uncheck the box. On the picture above, I have selected my account, drow.

4. After you have selected your account and unchecked the box, click OK.

5. Dialog window "Automatically Log On" will pop up. Don't enter a password and click OK.


Windows XP now knows what account you want as the default and it will automatically load that account.


Disabling logon screen after Windows XP resumes from standby or hibernation

1. Click Start, Settings, and Control Panel
2. Double click Power Options
3. Under Advanced tab uncheck the "Prompt for password when computer resumes from standby" option.
4. Click Apply and then OK.

Hibernate shortcut

The first step to making a Hibernate shortcut is to make sure you have Hibernate turned on.

Go to the Control panel then choose Power options, and select the Hibernate tab. Make sure Enable hibernation is checked.

Now to actually make the shortcut right click your desktop and choose New -> Shortcut. Next, type or copy paste this case-sensitive command into the dialog box:

rundll32.exe PowrProf.dll, SetSuspendState

Click Next. Give the shortcut a name and click Finish.
From now on all you need to do to enter Hibernation is double click the shortcut.

If you do not like the default icon, you can change it by:
- right click on the icon
- choose "Properties"
- click "Change Icon"
- put the following value in the "Look for icons in this file" field:
%SystemRoot%\system32\SHELL32.dll
- click "Ok"
- choose desired icon
- click "Apply"


Nice addition to this is installing (you don't even have to install it, just keep it running) a nice program called Hot Key Plus 1.01 by Brian Apps ( home page ) and set, for example, Windows key + H to activate your shortcut that you saved wherever you wanted.

Wednesday, May 19, 2010

Media Player Classic - Subtitles below picture

Media Player Classic internal subtitle renderer

The internal subtitle renderer of MPC works differently from the other subtitle filters. Instead of merging the subtitle image with the video before it gets send to the video renderer, it sends the subtitle image to the video renderer separately from the video. The video renderer is then responsible for merging it with the video. The disadvantage of this method is that it only works with certain video renderers. The advantage is that the subtitles can be placed anywhere on the visible screen. There is no need to enlarge the video frame.
Subtitle placement options can be found here:

MPC Options -> Subtitles -> Default Style -> "Screen Alignment & margins"
MPC Options -> Subtitles -> "Override placement" (don't use this one)


Monday, May 3, 2010

Comparative Examples of Noise Levels by Sources, Decibels & Their Effects

Noise Source
Decibel Level
Decibel Effect
Jet take-off (at 25 meters)
150
Eardrum rupture
Aircraft carrier deck
140
 
Military jet aircraft take-off from aircraft carrier with afterburner at 50 ft (130 dB).
130
 
Thunderclap, chain saw. Oxygen torch (121 dB).
120
Painful. 32 times as loud as 70 dB.
Steel mill, auto horn at 1 meter. Turbo-fan aircraft at takeoff power at 200 ft (118 dB). Riveting machine (110 dB); live rock music (108 - 114 dB).
110
Average human pain threshold. 16 times as loud as 70 dB.
Jet take-off (at 305 meters), use of outboard motor, power lawn mower, motorcycle, farm tractor, jackhammer, garbage truck. Boeing 707 or DC-8 aircraft at one nautical mile (6080 ft) before landing (106 dB); jet flyover at 1000 feet (103 dB); Bell J-2A helicopter at 100 ft (100 dB).
100
8 times as loud as 70 dB. Serious damage possible in 8 hr exposure
Boeing 737 or DC-9 aircraft at one nautical mile (6080 ft) before landing (97 dB); power mower (96 dB); motorcycle at 25 ft (90 dB). Newspaper press (97 dB).
90
4 times as loud as 70 dB. Likely damage 8 hr exp
Garbage disposal, dishwasher, average factory, freight train (at 15 meters). Car wash at 20 ft (89 dB); propeller plane flyover at 1000 ft (88 dB); diesel truck 40 mph at 50 ft (84 dB); diesel train at 45 mph at 100 ft (83 dB). Food blender (88 dB); milling machine (85 dB); garbage disposal (80 dB).
80
2 times as loud as 70 dB. Possible damage in 8 hr exposure.
Passenger car at 65 mph at 25 ft (77 dB); freeway at 50 ft from pavement edge 10 a.m. (76 dB). Living room music (76 dB); radio or TV-audio, vacuum cleaner (70 dB).
70
Arbitrary base of comparison. Upper 70s are annoyingly loud to some people.
Conversation in restaurant, office, background music, Air conditioning unit at 100 ft
60
Half as loud as 70 dB. Fairly quiet
Quiet suburb, conversation at home. Large electrical transformers at 100 ft
50
One-fourth as loud as 70 dB.
Library, bird calls (44 dB); lowest limit of urban ambient sound
40
One-eighth as loud as 70 dB.
Quiet rural area
30
One-sixteenth as loud as 70 dB. Very Quiet
Whisper, rustling leaves
20
 
Breathing
10
Barely audible

Saturday, March 27, 2010

How To Consolidate Windows 7 Control Panel Tasks In A Single Window

1. Right-Click the Desktop and Select New > Shortcut.


2. Copy and Paste explorer.exe shell:::{ED7BA470-8E54-465E-825C-99712043E01C} into the location box,  then Click OK.


3. Type in a name for your shortcut, such as “Master Control Panel.”

Okay the shortcut is created and it works, but let’s make it more "official looking".


4. Right-Click the shortcut and Select Properties.


5. Click the Shortcut tab, then Click Change Icon…


6. In the white box Paste C:\Windows\System32\imageres.dll and Click the Control Panel icon.  Once you’ve found it, Click OK.


7. To keep it from cluttering up the desktop, Drag and Drop the shortcut onto the Start Menu Orb.  This will pin it to the start menu for easy access from there.


Now when you access your newly created shortcut it will display every possible task in the Windows Control Panel via a new window.  The tasks will be separated by category headings for easy organization.  For best results, Change the view to Small Icons.


Taken from GroovyPost

Friday, March 19, 2010

Add server list to eMule

1. Go to Options/Server
2. Set "Number of errors allowed before removing the server" to 9
3. Click on "List..." button that appears next to the option Auto update
4. In Notepad that opens, add the following lines in the beginning:

http://www.gruk.org/server.met.gz
http://peerates.net/peerates/trueservers.met

5. Save changes
6. Unmark the two following options after "Auto-Update server list on startup"
7. Click on Accept
8. Go to Servers window
9. Remove all servers from static list
10. Remove all servers from list
11. In "Update Server.met from URL", write any of the URLs from step 4.
12. Click on Update button
13. If you have selected "Autoconnect only to servers on static list" add the servers you want to static list
14. Double click on any server to connect

Friday, February 26, 2010

Open Visio 2007 and Excel 2007 documents in separate program windows


Open Visio documents in separate windows:
-------------------------------------------------

1. Open Microsoft Visio
2. Go to Tools -> Options -> Advanced
3. Check the Put all settings in Windows Registry option
4. Close Visio
5. Run Registry Editor (regedit)
6. Navigate to the following registry key:

HKEY_CURRENT_USER\Software\Microsoft\Office\12.0\Visio\Application\

7. In the right pane, right click on SingleInstanceFileOpen, and then select Modify.
   Update the value of SingleInstanceFileOpen from 1 to 0.

(Create it if it doesn't exist. Use String type and make sure Visio is not running)


Open Excel documents in separate windows:
--------------------------------------------------

1. Open My Computer
2. Click on Tools, then Folder Options
3. Select the File Types tab
4. Scroll down to the XLS extension
5. Select Advanced
6. Select Open
7. Select Edit…
8. in the line that says "Application used to perform action:",
   go to the end of the line and add "%1" (that would be %1 WITH double quotes)
   so for example it may read something like
  
   "C:\Program Files\Microsoft Office\Office12\EXCEL.EXE" /e "%1"

9. uncheck Use DDE
10. Do not make any other changes
11. Click OK and click OK again
    (note: if you go back into advanced and back into the open action, you will notice DDE is checked again, however the DDE message is blank; this is fine.)

12. Now scroll down to XLSX
13. repeat steps 5 through 11 above
14. Click on Close
15. Now, when you click on Microsoft Excel 2007 spreadsheets, they will open separate windows for each Microsoft Excel 2007 spreadsheet that is launched.

Note: Microsoft Excel 2007 spreadsheet windows will open on top of eachother, so you will have to drag the windows in order to see them.

Auto-number rows in Excel

Unlike other Microsoft Office programs such as Microsoft Word, Microsoft Excel does not provide a button to automatically number data. However, you can easily add sequential numbers to rows of data by filling a column with a series of numbers or by using the ROW function.

Note   These numbers are not automatically updated when you add, move, or remove rows. You can manually update the sequential numbering by selecting two numbers that are in the right sequence, and then dragging the fill handle to the end of the numbered range.

  1. Select the first cell in the range that you want to fill.
  2. Type the starting value for the series.
  3. Type a value in the next cell to establish a pattern.


    For example, if you want the series 1, 2, 3, 4, 5..., type 1 and 2 in the first two cells. If you want the series 2, 4, 6, 8..., type 2 and 4.

  4. Select the cells that contain the starting values.
  5. Drag the fill handle Selected cell with fill handle across the range that you want to fill. To fill in increasing order, drag down or to the right. To fill in decreasing order, drag up or to the left.

Surround 5.1 in Winamp

VL Sound for Vista/7
v1.0.0.15

This is an output plugin to play music using a wide range of speaker configurations under Vista/7


Get it here <--

JAVA - ActionListener for MenuBar

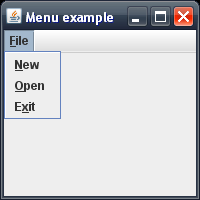
This example shows how to construct menus in Java.
The main Menu "File" contains three subitems. Each item can be accessed by a mouse click or by its keyboard mnemonic. Once a subitem is clicked a message is displayed explaining wich subitem was clicked.


import javax.swing.*;
import java.awt.event.*;
public class Menu extends JFrame
{
    public Menu()
    {
        super("Menu example");

        JMenu file = new JMenu("File");
        file.setMnemonic('F');
        JMenuItem newItem = new JMenuItem("New");
        newItem.setMnemonic('N');
        file.add(newItem);
        JMenuItem openItem = new JMenuItem("Open");
        openItem.setMnemonic('O');
        file.add(openItem);
        JMenuItem exitItem = new JMenuItem("Exit");
        exitItem.setMnemonic('x');
        file.add(exitItem);

        //adding action listener to menu items

        newItem.addActionListener(
            new ActionListener()
            {
                public void actionPerformed(ActionEvent e)
                {
                    System.out.println("New is pressed");
                }
            }
        );

        openItem.addActionListener(
            new ActionListener()
            {
                public void actionPerformed(ActionEvent e)
                {
                    System.out.println("Open is pressed");
                }
            }
        );

        exitItem.addActionListener(
            new ActionListener()
            {
                public void actionPerformed(ActionEvent e)
                {
                    System.out.println("Exit is pressed");
                }
            }
        );

        JMenuBar bar = new JMenuBar();
        setJMenuBar(bar);
        bar.add(file);

        getContentPane();
        setSize(200, 200);
        setVisible(true);
    }

    public static void main(String[] args)
    {
        Menu app = new Menu();
        app.setDefaultCloseOperation(JFrame.EXIT_ON_CLOSE);
    }
}

Unable to move (rearrange) toolbar buttons in Firefox

Solution found by Jeremy

I seem to have found the cause of this issue. I started firefox in safe mode with all plugins and addons disabled and found I could buttons around. I restarted firefox normally, disabled the few plugins I had one by one and found the culprit was the skype plugin that comes with skype. I uninstalled skype (addon) and the issue appears to have been completely resolved.

Solution found here.

.

Remove Photoshop CS4 portable license agreement popup

The license agreement pops up whenever you start Photoshop ?
Everytime ?

Rename adobe_eula.dll to something else.

.

Miranda Icon Blinking settings

SysTray:
Options -> Contact list -> System tray icon area -> Disable icon blinking

General:
Options -> Events -> Ignore -> Suppress online notification (set for all users)

 .

How to reopen a closed tab in Google Chrome

You finally get to the webpage you've been surfing for and now you've accidentally closed the tab. This can be a very frustrating situation. Chrome is quite forgiving and allows you to easily reopen the closed tab, even if you've closed other tabs after it.

Using a Keyboard Shortcut:
By using the keyboard shortcut Ctrl+Shift+T, Chrome will open the last tab that was closed. Use the keyboard shortcut again, and it will open the tab that was closed before that, and so on. You can use this method to restore up to the last 10 tabs that have been closed during your browsing session.

Using the New Tab Page:
Open up a new tab. Go to Recently closed tabs section located in the lower-right of the page. You will find the last 3 tabs that have recently been closed during your browser session.

.